The Klein Bottle
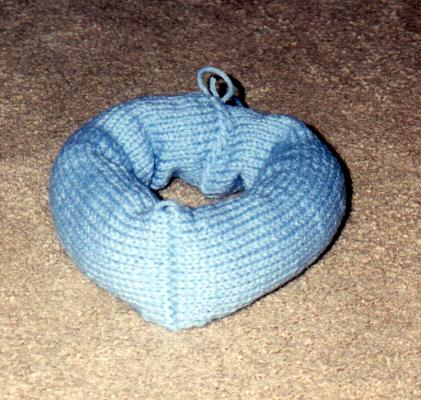
![[Klein Bottles. Select for larger picture.]](pics/sidebottom.jpg)
|
|
A side view of the knitted Klein Bottle, and also a bottom view of the same work, so you can see how the sidedness changes and the neck widens. |
Check the link above for more information about Klein Bottles (and don't forget to check out the pretty borosilicate ones at www.kleinbottle.com). Basically, it's a one-sided closed surface with one hole and one handle. As such, it can't be embedded in three dimensions, but only immersed there (which basically means you have to allow the surface to intersect itself to put it in three dimensions). You can get one by glueing the edges of two Möbius strips together (which you can't without interections, of course), or glueing the ends of a cylinder together after giving it a half-twist (which isn't as simple as it sounds; check the pictures at the various sites to understand what that half-twist entails). The standard immersion has the self-intersection in a circle on the side; it's usually accomplished in models by making a hole in the side and passing the tube through. This essentially makes a Klein bottle minus a disc, which is still pretty cool. The website at woolworks.org gives instructions on knitting one like that, which I followed with some modifications. It's pretty neat. And with the hole you can see the "inside" and generally access the whole thing, to get a better feeling for how it works. It also talks about a Klein Bottle Hat, which sounds really cool! It's straightforward enough: go 'round and 'round on double-pointed needles, leave a slit after a while, then close up and decrease (so the neck is small enough to pass through the slit), knit a tube, pass it through the slit, increase back up, and graft edges together. This one I did in stockinette, swapping sidedness near the end so the base was also knitside-out.
|
|
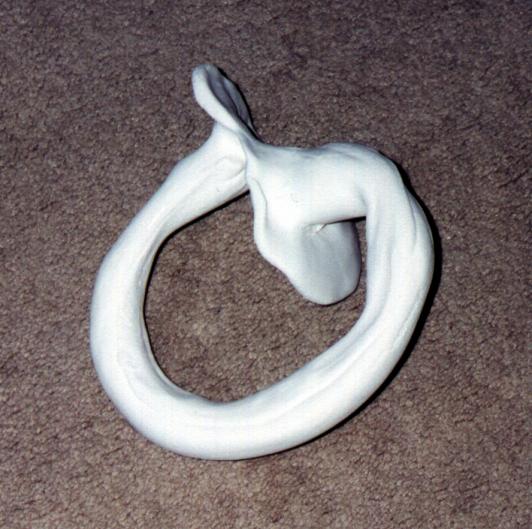
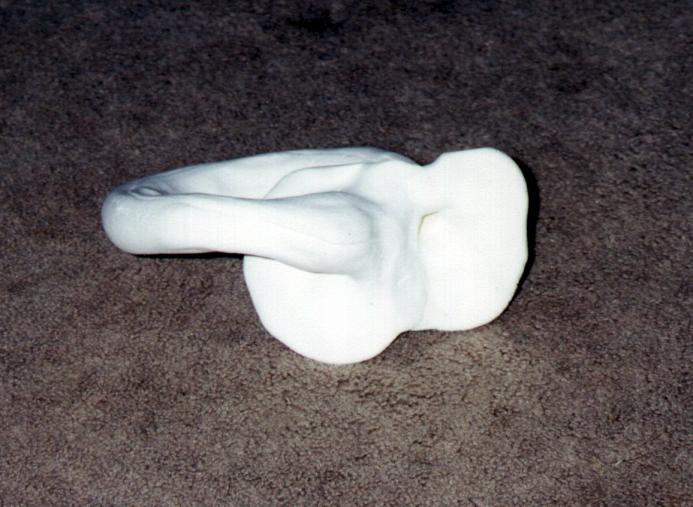
The Klein bottle (minus a disc) of modeling compound. I think you get the idea of its configuration. You can also see a side view of the piece. |
I also have an interesting version of the Klein-bottle-minus-a-disc made out of modeling compound. It doesn't look much like the usual immersion, but it's topologically equivalent. In its own way, it's even cooler, since it's a little more obvious just how bizarre the shape is, even though nothing really sneaky needs to be done in the making. I used Crayola modeling compound, which is strangely pleasant to work with. It's spongy and foamy and light, yet soft and moldable, and doesn't crumble. It stays spongy even when dry, too. Basically I just rolled it out into a rectangle, joined the long edges together to make a tube, then stretched the tube out some (the Crayola compound handles stretching very well). Then I bent the tube around as if to form a torus, but instead of joining the ends together, flared the ends to make sort of discs around the ends of the tube, and then merged the discs together to make a sort of platform with the tube leading out of it from both ends (but not opposite each other). When I get a picture up you'll see.
Other Immersions, and True Self-Intersection
|
The "crosshandle" immersion. The line of self-intersection is facing you. |
I have another immersion of the Klein Bottle knitted. I'm pretty sure I can see how to get this one from the standard immersion, but I've never seen it before. I'll call it the "crosshandle" immersion. Essentially, it's a torus with a line of self-intersection. Picture taking a cylinder, and somewhere along the line turning one end inside-out by passing the sides through each other, so it looks like there's a sort of pinch in the cylinder along a line. Then join up the edges. That's basically what I did: knitted a tube and passed the sides of the tube through each other. You can do that with knitted fabric, since there are holes already between the stitches, so the stitches can literally interpenetrate. That's how I got the projective plane with true self-intersection. This was quite a bit harder, though, since with the cross-cap had its line of self-intersection across the rows, so the needles just passed over and under each other. This immersion has its line of self-intersection along a single row, so you actually have to interdigitate the stitches and knit them off onto different needles in different directions... It was tricky. I could tell what I was doing was non-obvious when I found I needed five double-pointed needles. There's a reason they come in packages of four, and I was using five.
I'll try to describe how I did it here; you might want to skip the next paragraph if you don't want the gory knitting details.
Cast onto a set of double-pointed knitting needles, distributing your stitches on four needles (not three like you usually do with dp needles). It therefore is helpful if you use a multiple of four stitches (I used 28 in the one I did, seven per needle). Work around until the tube is "long enough." I like the idea of having the pinch of self-intersection and the seam where the ends are joined on opposite sides of the work, so I make the tube half as long as the total torus before doing the intersection. You may want that length longer or shorter depending on how wide your tube is and what inside/outside diameter proportions you want for the finished product. Then you have to do the intersection. What I did was consider the four needles to be two sets of two, representing the two halves of the cylinder which were to pass through each other. Then I slipped the stitches off the four needles all onto a fifth needle, alternating halves. So if the needles are #1, #2, #3, and #4, in order, and the you've just finished knitting #4 and are about to start on #1 again, you slip from #1 and #4 alternately until they're used up, then #2 and #3, keeping with the alternation. Then you slip from the needle you just put them on back onto four needles, just like the ones you started from, but with the alternation in the other direction. It's hard to explain, but I think you understand what the idea is. It isn't easy, though, since the stitches get tight. Then all you have to do is just keep knitting around now that things are back in a circle, right? Well, in theory yes but not practice. You can't really knit off one needle with the one it's oh-so-tightly bound to right next to it without dropping stitches off that one, unless you're really careful with moving the one needle back without moving the other, and probably not even then. What I did was take two needles in my right hand, holding the two parallel ones with stitches on them in my left hand (ignoring for the time being the other pair. Yes, that's now six needles) and knitted onto one of them and slipped the alternating stitches onto the other one. This was not easy. It's also important to keep the yarn between the needles at all times, even (especially) when slipping. Otherwise it sort of ties the halves together and they never separate as they should. I learned this the hard way. If you do it right, though, then after a row or two you should be able to go back to knitting approximately normally. I think somewhere along the line the direction of the yarn around the tube actually winds up reversing itself, unless you switch to knitting left-handed (or right-handed, as the case may be) when you do the intersection. It's not really important, though. I also switched knit to purl just at the intersection row, so the knit side is out everywhere. Then just work around as normal until it's "long enough" and sew the ends together. I stuffed mine so it would hold its shape a bit and left the yarn sewing the ends together loose (just tied up in a bow) so I can open it up again if I want. Whew.
Figure Eight

|
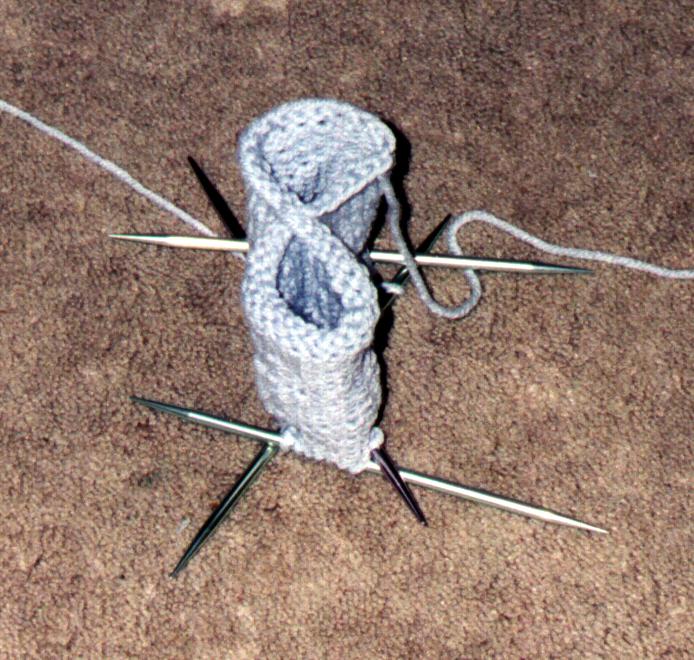
The figure-8 immersion of a Klein Bottle. Here's a picture of the figure-8 cylinder being made. |
I've also finished a figure-8 immersion of a Klein Bottle at the moment. I knitted a figure-eight cylinder: just a cylinder with a line of self-intersection down the middle, so it has a figure-eight cross-section (here's a picture of it, when it was short). It's a little tricky, but not much; uses the same self-intersection technique as the cross-cap I knitted. Then I joined the ends with a half-twist (as though making a Möbius band) to make the Klein bottle. Actually, the cylinder itself is pretty darn cool; almost a shame to close off the "inside" to inspection. Maybe I'll make another cylinder and not close it up, just bind it off at the end. And I'll make it short so you can access the inside easier. I'm making it in stockinette, so you can really see that the two loops have opposite sidedness. It's cool enough that I'm considering making yet another cross-cap, this one in stockinette, to show that off there as well.
Making the figure-8 cylinder isn't too tricky, once you get it started. You need 6n stitches distributed over four double-pointed needles. This is another one of those cases where you need an extra needle. I used 42 stitches. You have to distribute them a little strange, though. I put 7 on one needle, 14 on the next, then 7 on the next and 14 on the last. The two longer ones cross in the middle, you see, forming two triangles of seven stitches on a side each. Arrange in the figure-8 and carefully work around. You'll need to the tricky self-intersection thing at the crossing. This means you'll be knitting off of the lower needle of the two that cross, you knit seven stitches (half of them, and you should count; sometimes they slip through the holes), then take the needle out from where it pierces the fabric under the higher needle and continue knitting off of it above the other needle. Then when you get around to the other one, it will be the lower, and so on. Work around until it's long enough, sew together, etc. I stuffed mine, and did it while I was working on it. Otherwise it would have been very difficult to get the stuffing waaay down in the middle of the very long tubes.
It's kind of neat to have a Klein bottle with true self-intersection that preserves a little more of the four-dimensional shape's symmetry. The standard immersion has wider and narrower parts that aren't necessary parts of the shape, and the cross-handle immersion has that line of self-intersection that disrupts the smooth cylinder shape.